One of the most common thrift store finds is the underrated memo board. You can walk into any thrift store or even at a craft and décor store, and memo boards are always an easy find. They are built to blend into the background, just a board to hold pictures, notes, and anything in-between. However, most times they’re not created to truly reflect your personal style, right? A thrifted memo board is the perfect blank canvas waiting to be customized into something that feels uniquely yours. In this simple DIY, I’ll share a basic memo board that I found at the thrift store and how I upgraded it by adding some colorful accessories that made it feel fresh and fun.
Why I Love Memo Boards
I think everyone knows by now that I have a “normal” and “healthy” relationship with my local thrift stores. I feel like these memo boards are everywhere. I imagine most are donations from a collage graduate, or people that have converted most of their physical stationary notes and items to digital files. In the world of simplifying our lives with technology, I feel like I have so many files on three different platforms, and it can be overwhelming and feel disorganized. I am the worst at out of sight out of mind, and when it comes to files in folders on computers and phones, I’ll forget the most daily things. I have great success with memo boards for keeping lists, notes, photos, and even using as a mood board to help bring together a space or a standalone décor. The only down side is a mood board directly off the shelf rarely fits the design vibe.
Memo Board Construction
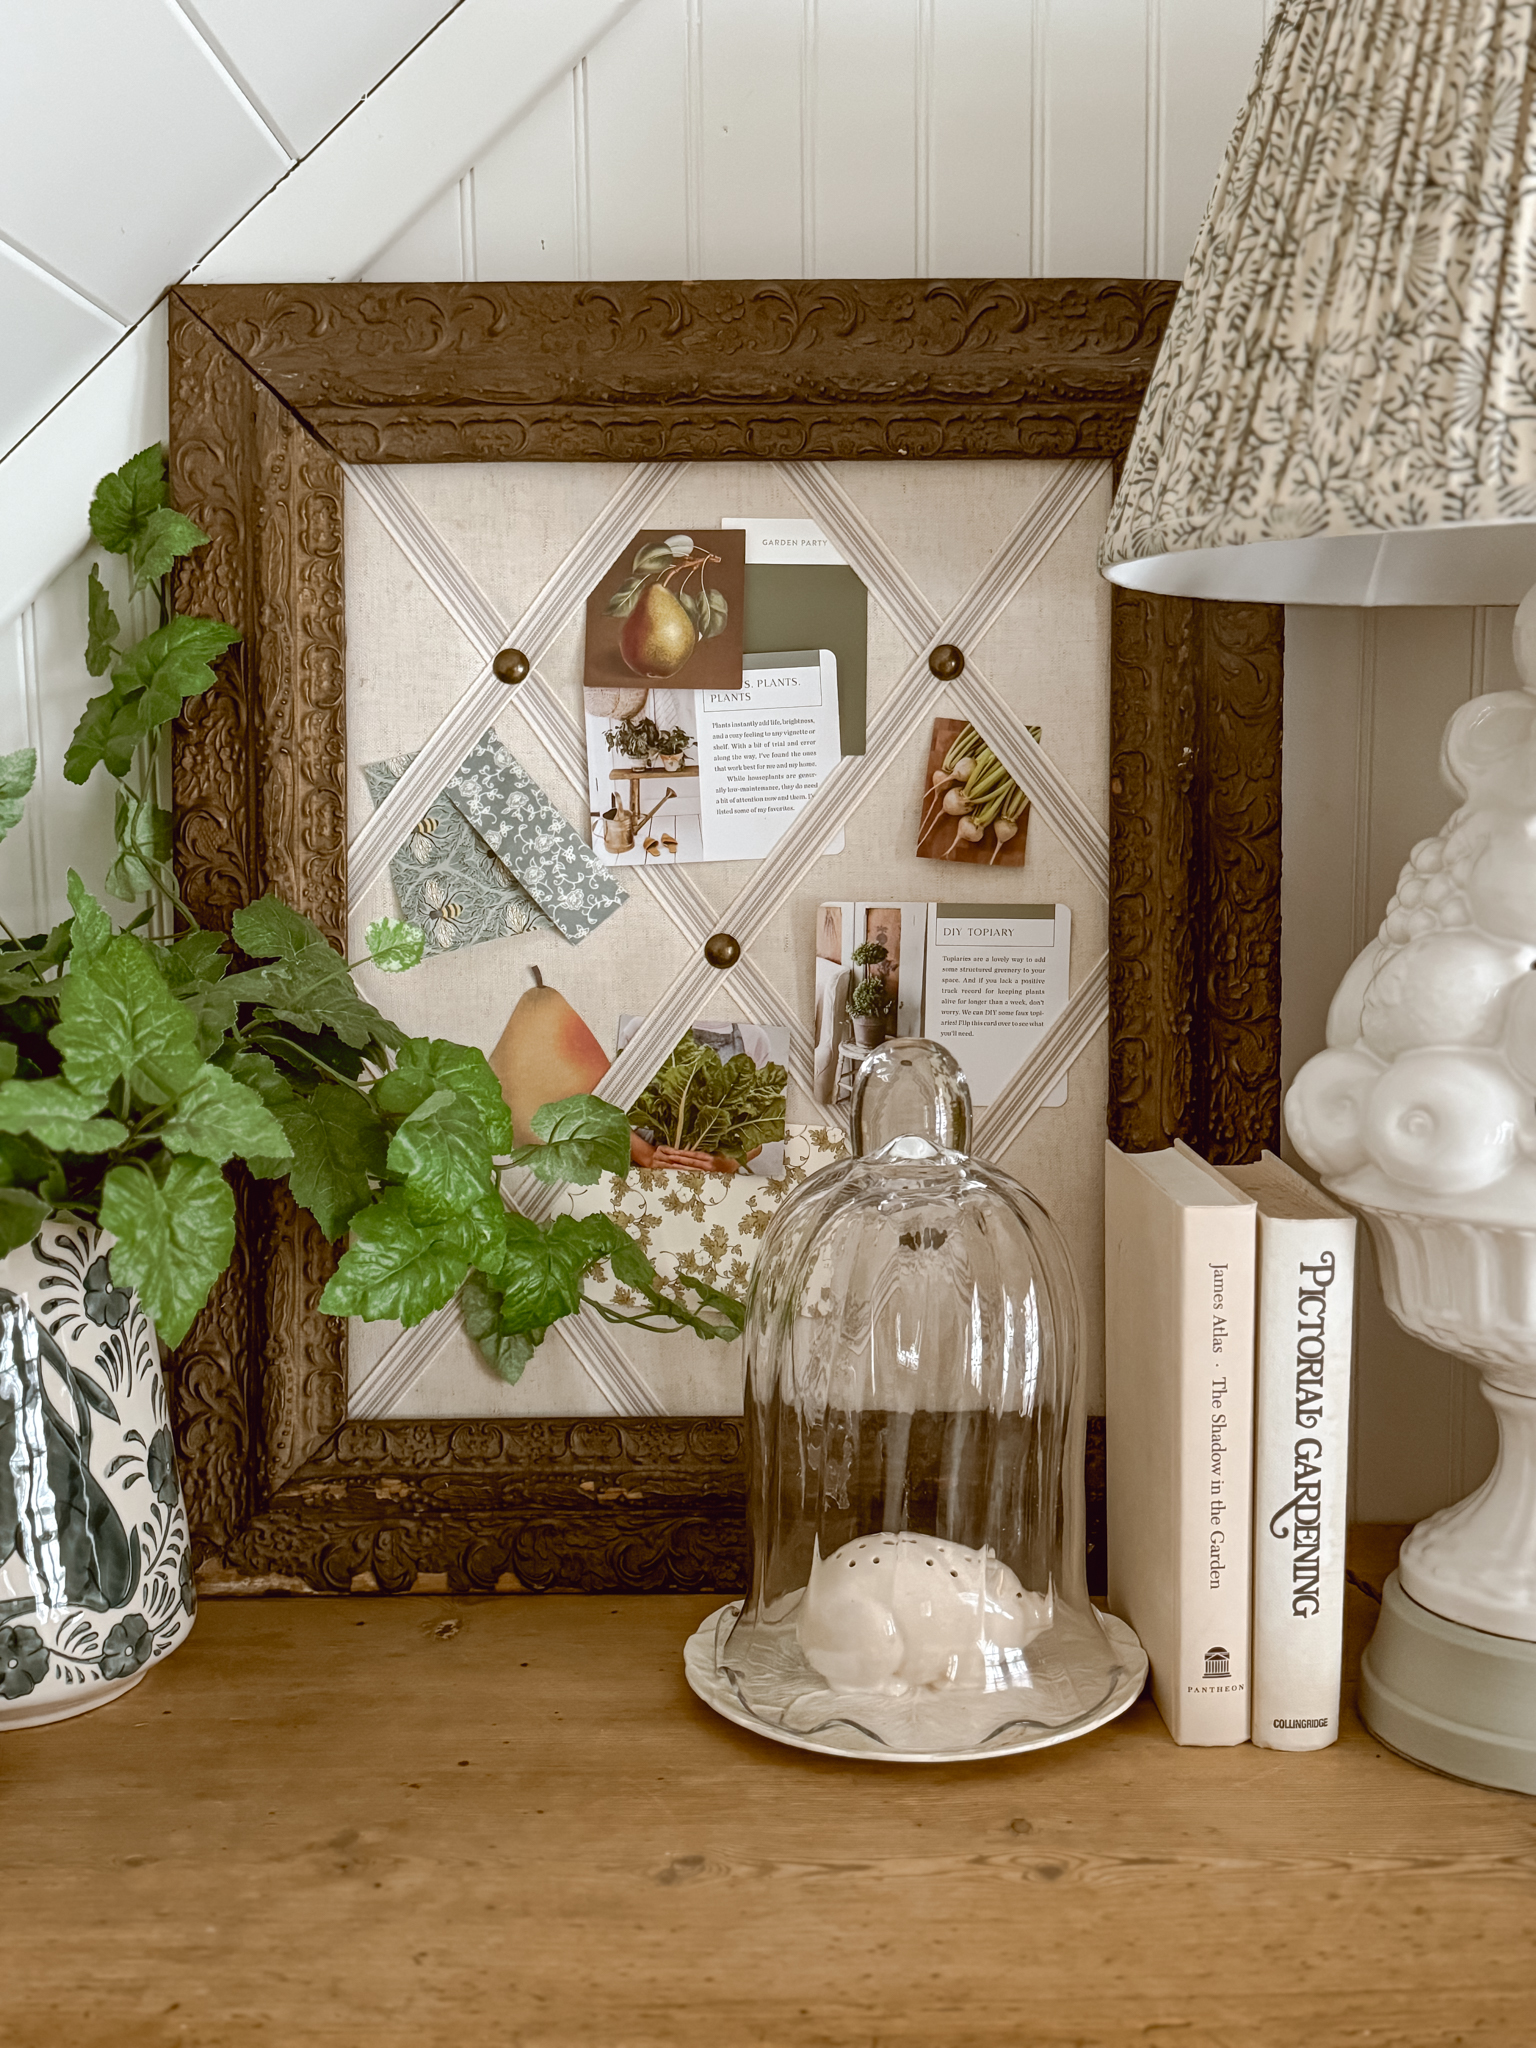
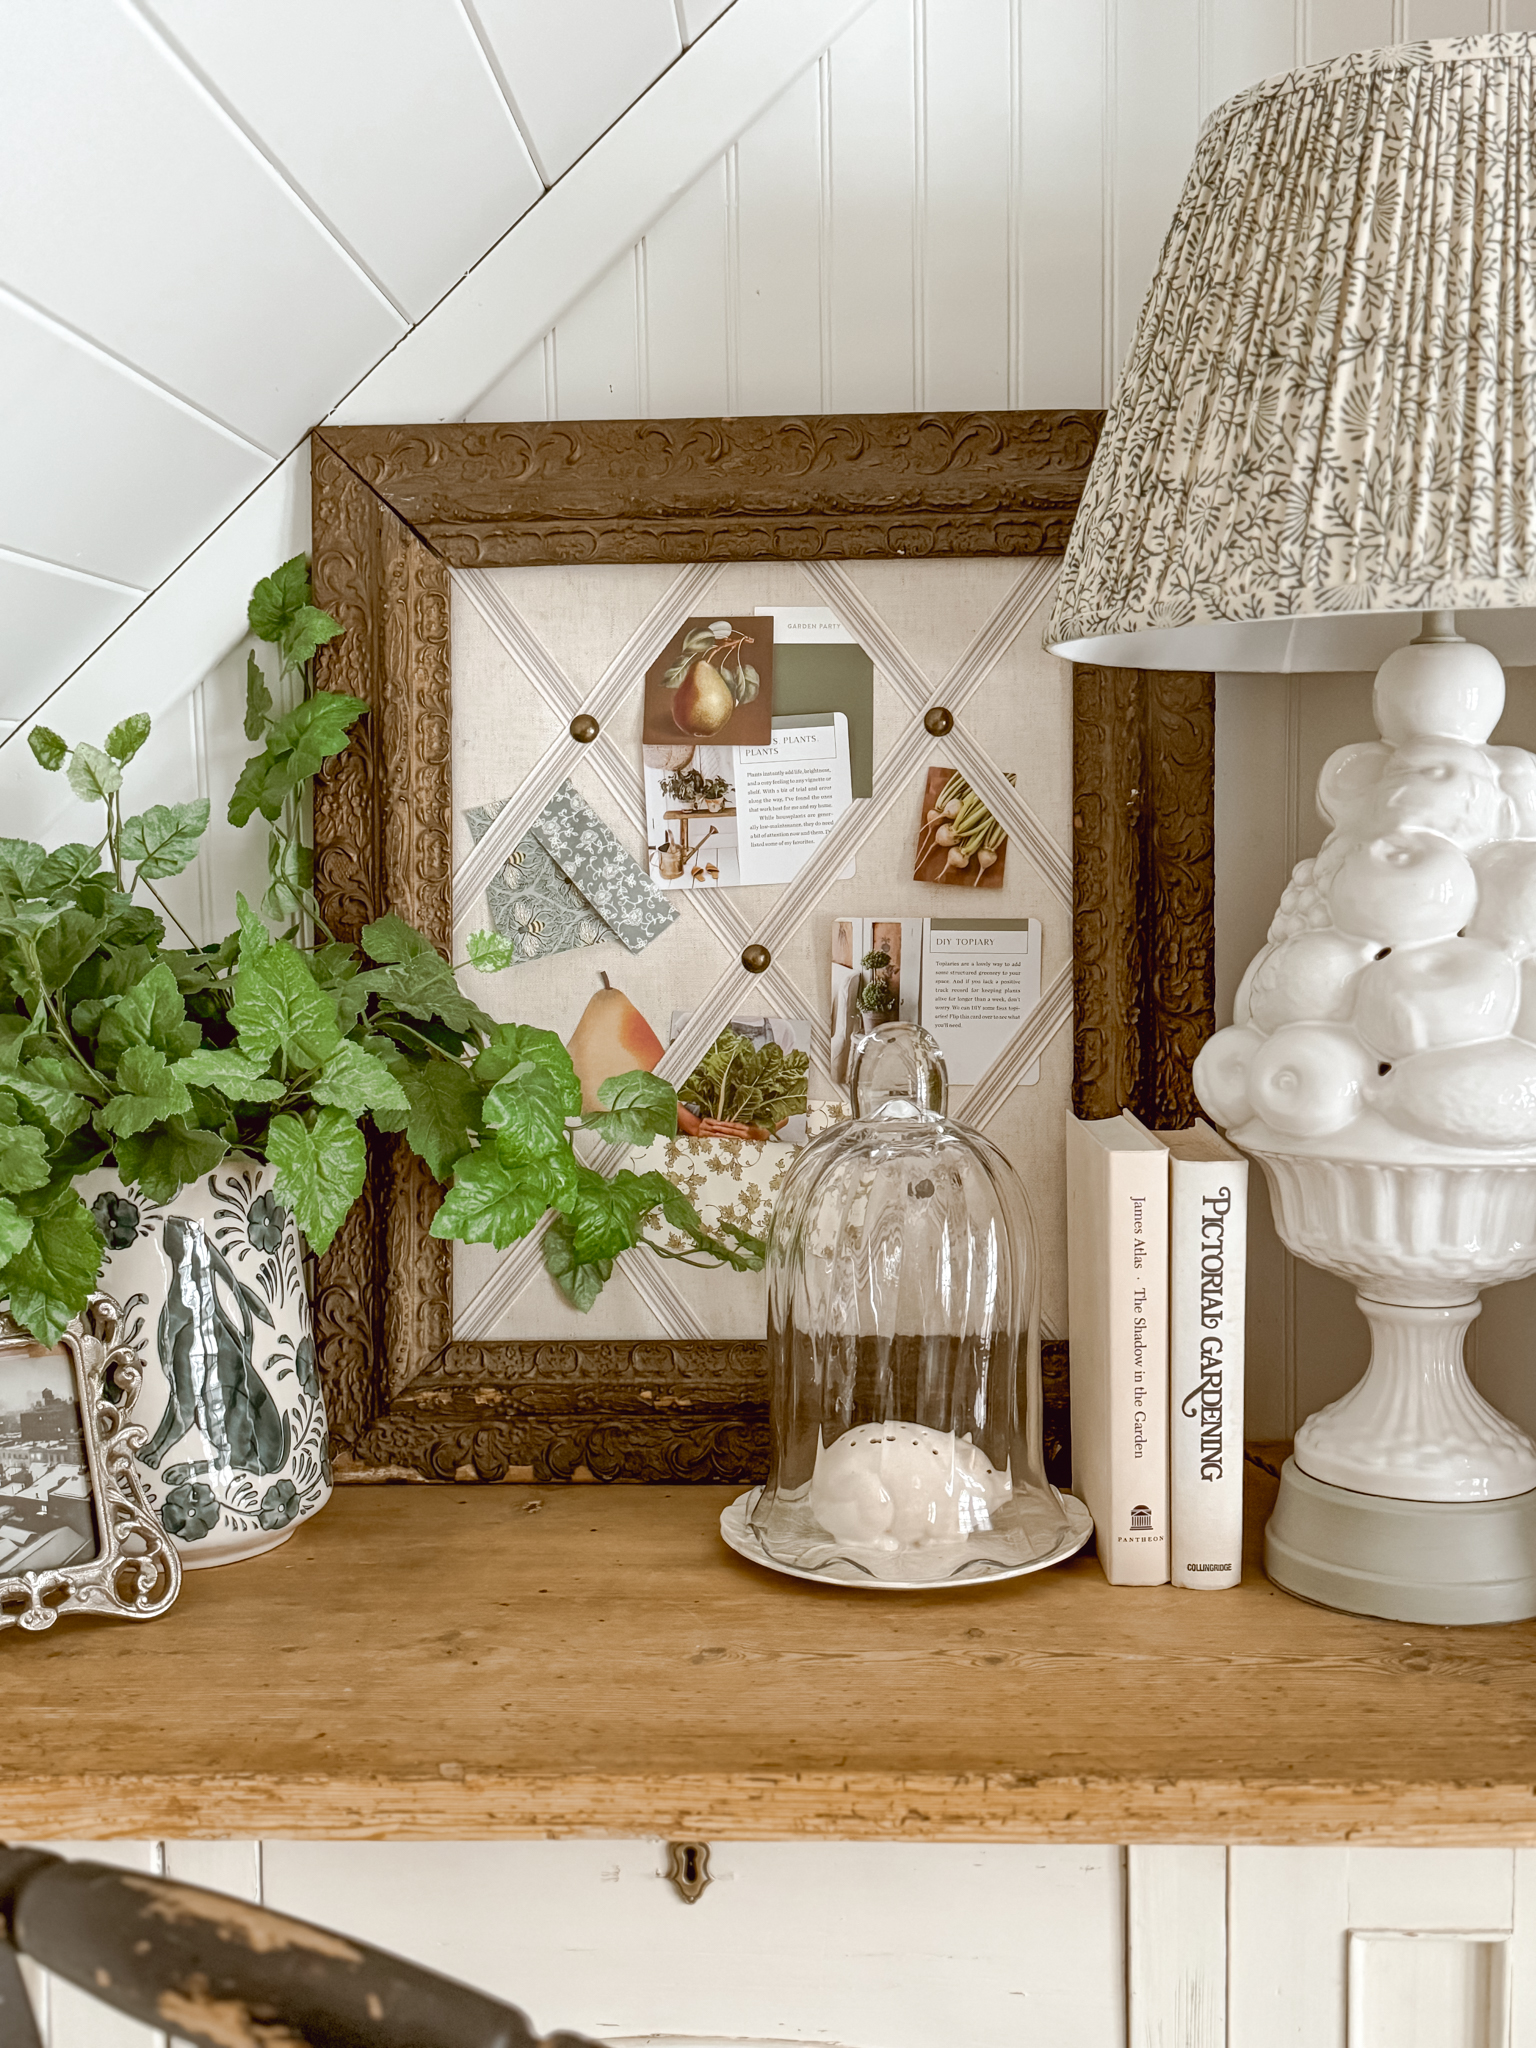
Most memo boards are constructed in the same way. A fabric wrapped corkboard, diagonally crossed ribbon and buttons to give a tufted look. There are so many options here from a fully deconstruction, changing the fabric to something completely your aesthetic. When doing this try to carefully remove all the staples attaching the fabric to the board so you can use the removed fabric as a template, keeping note of how they folded over corners and edges before stapling it in place. For the most simplest ways to give these a facelift, the majority of memo boards that I see have a linen colored fabric or neutral fabric, using these you can leave the wrapped fabric and only focus on the ribbon and the buttons.

Memo Board Deconstruction
Start by removing the buttons on the memo board with a pair of pliers. Most of the time, the head of the button will come off but the pin portion of the button will stay in place. That is fine! We will install nail head push pins alongside them. Also note, be careful with the fabric where the tools will come in contact. It may be helpful to have a little buffer like a clean kitchen cloth to help with avoiding damage or staining the fabric with your tool.
Ribbon Upgrade
The fastest upgrade is to install the ribbon right overtop the previous ribbon. It will keep things aligned, and you’ll install the new ribbon so tight that you will not notice the old ribbon underneath. Once the ribbon is all laid out overtop install the new nail head push pins, starting from the center and move your way outward towards the edge, pulling the fabric tight each time you install a new pushpin. Once all pushpins are installed, pull and wrap the ribbon around the back of the memo board and staple to secure.
If you are choosing a more sheer ribbon and the other ribbon is noticeable underneath, or the ribbon you’d like to use is more thin than the previous ribbon, you’ll want to mark an single side of the ribbon, where it touches the edge of the memo board. This will serve as your reference point for your new ribbon. Once you have it all marked, cut and pull out the ribbon but be careful not to damage the fabric wrapping the memo board. Repeat the previous steps laying out the ribbon to your reference marks, and installing the new pushpins by starting at the center working your way outward.
Finish It With a Frame
You can stop here or upgrade your memo board a bit more with a frame. I have a stack of old frames in a closet for these type of projects, or frameless print and artwork. You can typically find very affordable frames, without artwork at antique shops and thrift shops. Also, I encourage people when shopping at these places to look past the artwork in the middle. So many people pass up great prices on great frames because they don’t like the artwork. The artwork or print can be removed from the frame. We placed our memo board in the frame and secured it with very little trim screws, and it was the perfect cherry on top.

Thank you so much for stopping by the blog today and every other day. It truly means the world to us here on the farm. Make sure to keep up with us daily on LTK, Facebook, Instagram,Pinterest &TikTok. As always, Stay Cozy!